Building Salesforce Mobile Apps With Ionic and Angular – TUTORIAL

It would not be very useful if we were learning to build Salesforce Mobile Apps using Ionic and Angular without even having a proper understanding of what Salesforce is and why it is widely used by companies all over the world. In this article, let us build a Salesforce mobile app with Ionic and Angular with a detailed tutorial.
Table of Contents
What is Salesforce?
Salesforce is one of the leading CRM ( Customer Relationship Management ) software on the market. If you’ve never heard of a CRM, to put it simply – it’s a tool for managing the relationships with your customers in one place. Let’s say your company has hundreds of people in the Sales department, and since your business is expanding day after day so is the number of your clients and customers.
The more clients you have the harder it is to ensure that all of them feel important and get quality service. And in the unfortunate event of an employee leaving the company or switching jobs – it can even be harder to get back up to speed with all of the clients that they previously used to handle. All of this calls for a centralized system of storing & accessing customer data, and that’s exactly what Salesforce accomplishes. It has a well-defined system for storing & managing Customer Contacts, Accounts, Addresses, Social Media, Sales, Orders, and tons of data points that can be incredibly useful.
What is Ionic Framework and Angular?
Ionic framework is “An open source mobile toolkit for building high quality, cross-platform native and web app experiences”. If you’re reading this you probably might be familiar with many such frameworks that develop Hybrid Apps which can run on iOS, Android, etc all with the same codebase. Some of the popular ones would be React Native, Cordova, etc. But the thing that sets ionic apart is that it doesn’t just support one framework ( for eg. React Native apps can be built only on top of React Web Apps ), but Ionic apps can be built upon all the three major web frameworks ( React.js, Angular.js, and Vue.js ).
This allows developers to all build the same app using the web framework of their preference. Also, not to mention Ionic apps are superfast and have support for all core mobile features ( Camera, GPS, Sensors, etc ).
What and How we’ll build the Salesforce and Ionic App
The best way to learn about something is to get your hands dirty and build an application. This way, not only you will have a finished product to show off at the end – but you will also have reinforced the concepts that you have learned and therefore they’ll stay in your mind for a long time
Since we’re building an app that uses Salesforce which is a CRM software, a good idea would be to build a simple application that displays a list of Salesforce Contacts
There are two ways to build a Salesforce + Ionic project
- By installing Salesforce Plugin on an Ionic v2 Project ( obsolete )
- By using the Dedicated Force Hybrid Tool to build hybrid salesforce apps
The first method is pretty much obsolete by today’s standards but we’re still gonna be discussing it since you might come across some really old code that uses that particular method of integration and it’s always better to know about it beforehand.
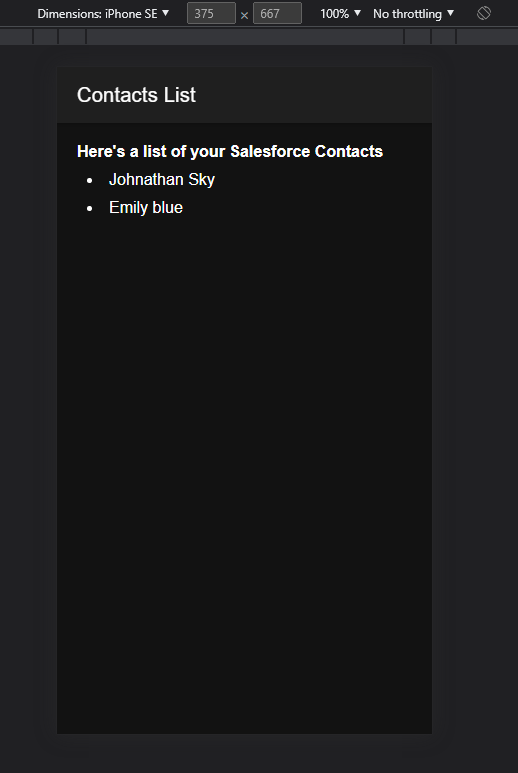
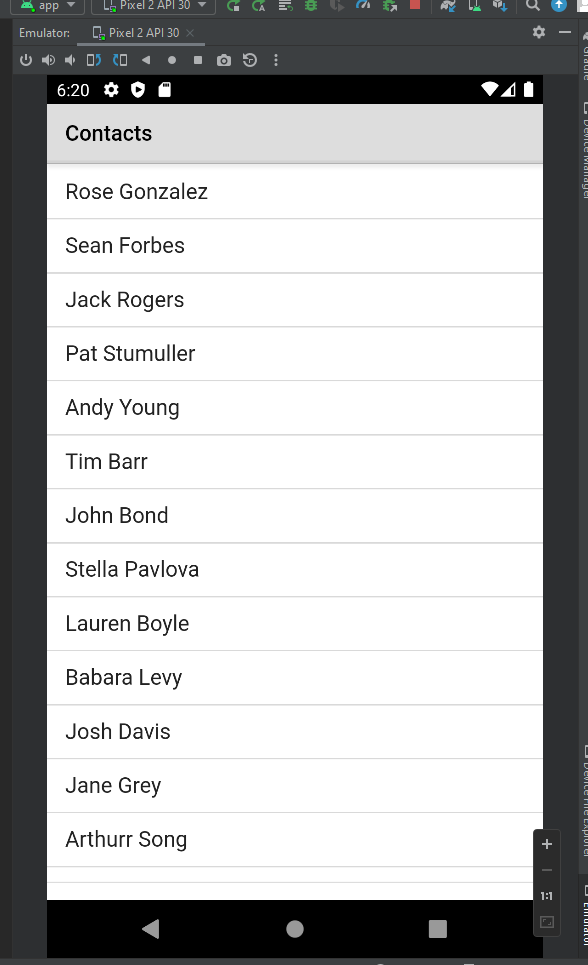
To keep you excited here’s a demo of the final application
Salesforce Plugin + Ionic v2 Demo
Forcehybrid Demo
The Old Way of building Ionic + Salesforce Apps (Obsolete)
Let’s start by building the Salesforce + Ionic app using the obsolete method. It should only be considered if you’re already working on an existing Ionic + Salesforce project and is not recommended for creating a new project
Getting the required tools for Ionic + Salesforce App
Node.js & NPM
Since ionic is a javascript framework, to install it, we have to first install Node.js and the Node Package Manager ( NPM ) That comes with it. Although this article assumes basic familiarity with Javascript, if you don’t know what Node.js is, to simply put it it’s a javascript runtime which means all of the javascript code we write is run on Node.js. And that we install Ionic using the Node Package Manager that comes with Node.js
- To install Node.js simply visit their homepage https://nodejs.org/en/
- Download the installer for the latest stable version ( 16.16.0 LTS as of writing this article )
- Follow the on-screen installer and you should have Node.js installed on your computer
Ionic

Now that we have NPM & Node.js installed, we can install ionic by simply running the following command in CMD or Powershell
npm install -g [email protected]This should install Ionic globally on your machine ( The -g flag in the command above specifies to install ionic globally )
IMPORTANT: Do make sure that you are installing the correct version of Ionic ( Version: 3.2.0 ) since we are building the app using an obsolete method newer / latest versions of ionic WILL NOT WORK
Tip: If you get any sort of Permission Denied error while running the above command, this means that npm does not have enough permissions to install ionic, in that case, you should try restarting your CMD or Powershell by choosing the Run As Administrator option
Android Studio
Ionic can build both iOS & Android apps, but building iOS apps requires you to have iOS SDK which is only available on macOS. Since most other of theCLIers would be using Windows/Linux we’ll mainly focus on building Android apps, and for that ionic requires that we have Android Studio installed.
But the best part about its, while building android apps in ionic, we don’t need a lot of setup in Android Studio as we might have needed if we were to work on some other framework.
- To install Android Studio, visit their official website, https://developer.android.com/studio
- Click on the Download Android Studio button and wait for the installer to finish downloading
- Once the installer is downloaded, open it and choose all the default options that Android Studio provides
Visual Studio Code ( Optional )

As we’ll be writing tons of code in this tutorial, we’ll need a good Code Editor / IDE. If you’ve never worked with an IDE ( Integrated development environment ) before, you’ll be surprised to know how much it helps us to quickly write code by providing advanced features such as Syntax Highlighting, Auto Completion, Error detection, etc to name a few. There are many popular IDEs on the market, but for our tutorial,l we’ll be using Visual Studio Code, which is what most people seem to prefer these days
Cordova

If you haven’t worked with the Older Versions of Ionic, you might have questions like “Why do we need Cordova while building an Ionic Application?”. The truth is, in older versions of Ionic the only way to access native mobile features or to install plugins was using Cordova. But Ionic today is much more different, independent and robust than what it used to be a few versions before.
As we discussed, it’s only possible to install Cordova on something called NPM ( Node Package Manager ). Now that we have Node.js ( and NPM ) installed, we can install Cordova on our machine by simply running the following command on your CMD or Powershell
npm install -g cordovaWhat this command essentially does is, install the “Cordova” package globally (accessible from anywhere in the system ), and that’s what the -g flag signifies
Tip if there’s some error running this command, ( such as ACCESS DENIED ) try running it by opening the CMD or Powershell as RUN AS ADMINISTRATOR, as it might require admin privileges to globally install Cordova
Setting up the Ionic Salesforce Application
Now that we have all of the essential tools setup, it’s time for us to Set up the Ionic Project. Pay close attention, as this process will be similar for almost all of your new ionic projects
To create an Ionic Project, simply run the following command
ionic start <Project Name>Here <Project Name> will be the desired name for your project ( without any spaces ). In our case, let’s name the project as SFContacts
ionic start SFContactsYou will then be prompted to choose the Framework ( React or Angular ) while making the project. For this tutorial, we’ll be going ahead with Angular

Then you can choose a Starter Template for your application, if you’ve never worked with Ionic before or don’t know what a Starter Template is, it’s a Mini Application with a few components already in place. These starter templates are quite useful if you want to set up your projects quickly.
But since the goal of this tutorial is to learn from scratch, I would recommend choosing the blank template

And if everything went alright, you should see the following message on the terminal

This should also create a New SFContacts folder with the following files
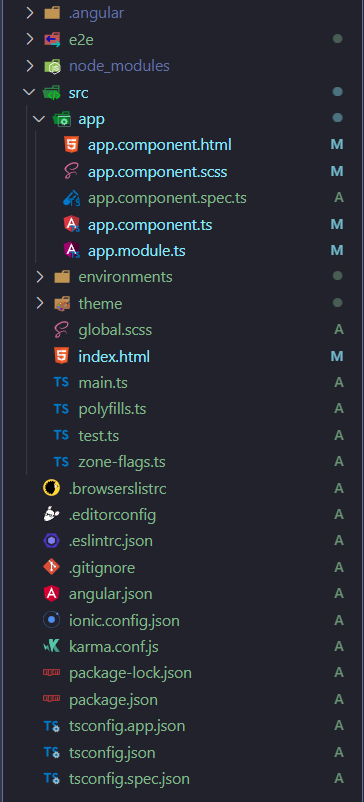
It’s easy to get overwhelmed looking at the huge amount of files and folders present, but not all of them are important to know about. Also, once we start to break them down into categories, it’ll be easier to make sense of them
Configuration files
These are the first things you’ll notice in your project folder, there are many configuration files, but let’s have a look at the most important ones
- ionic.config.json this file contains important information about our ionic projects such as the project name and the web framework used for the project
- tsconfig.json The typescript configuration file. Ionic uses typescript by default instead of javascript. If you have never heard of typescript before, it’s just a typed version of Javascript, ( which means, that a variable can be of only one type ( string, number,r, etc ), unlike javascript where we can puta value of any type into any variable )
Source files
To understand these source files we first have to understand the main parts of an Angular Project
Any Angular Project is made up of small components that all interact with each other and make up our Application. Modules describe a collection of Components that are closely related and form a particular app. For a simple application, we usually require only one module, the root module
By default, we get the root module in the form of app.module.ts and whenever the app is launched, the thing that runs first is the App Component provided by angular.
Ionic has already done most of the setup for us, by launching the Ionic App Component as soon as the Application is run. So the only thing we need to do now is to edit the files inside the App Component to build our app
Installing Salesforce & Adding Supported Platforms to the Ionic + Salesforce Application
Now that we have created the Project Folder of the application and understood quite a bit about it, it’s time to finally get started and work on the application.
Let’s get started by installing the Salesforce Plugin on the Ionic app. As we discussed earlier, we will need to make use of Cordova to install plugins on Older Ionic Versions. And if you know anything about Cordova, you will also know that it requires you to declare the platforms that the app will run on.
Most of the people will be targeting iOS and Android, so let’s add them to the application by running the following command
ionic cordova platform add android iosAfter installing the supported platforms, it’s time to install the Salesforce Plugin using the following command
cordova plugin add https://github.com/forcedotcom/SalesforceMobileSDK-CordovaPlugin.gitThen, you also need to install the forcejs library to use the Salesforce Mobile features such as OAuth, Net, and a lot more.
npm install forcejs The above commands should take a while depending on your internet connection but once it’s done, you’ll have Salesforce Installed & Ready to use!
Getting the API Keys to access the Salesforce Data
If you don’t know what API Keys are, they are essentially a Security Measure that ensures that only the Right Person has access to the data.
Think about it, if services didn’t have API / Consumer Keys then almost everyone would be able to access the entire data. And especially in an environment like Salesforce, we DO NOT want others prying on our data.
That’s why, to operate Salesforce Apps, it is mandatory to use API Keys.
To create an API Key
- Navigate to your Salesforce Dashboard
- Search for App Manager in the search bar
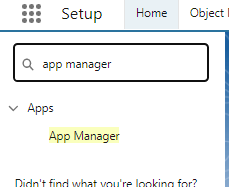
- Click on the New Connected App button and fill out the details for your Salesforce Application
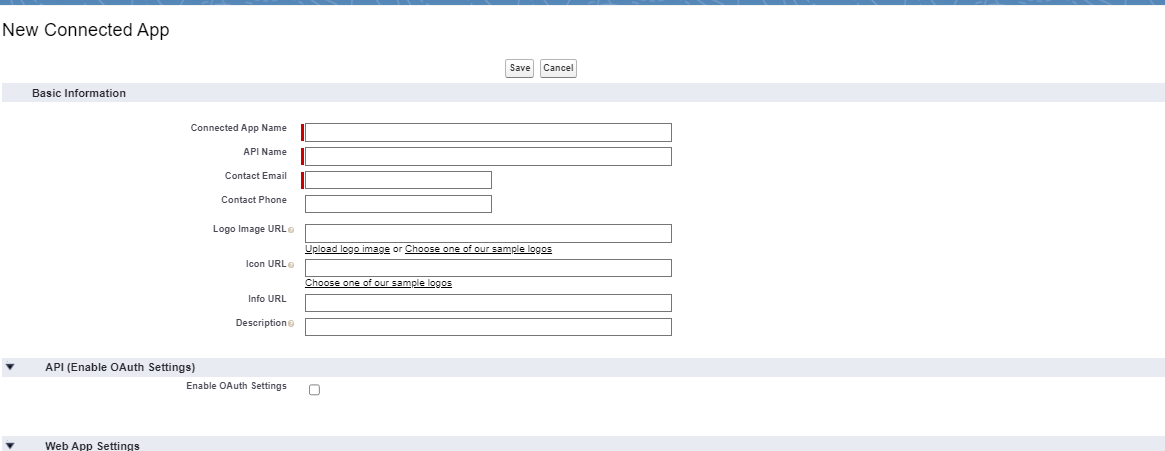
- Make sure to turn on the Enable OAuth Settings option
- After entering the app details, click on Save and find your entry in the App Manager Section

- Click on the View button to view the App Details and copy the Consumer Key to store it somewhere safe for a little while
Working on the Ionic + Salesforce Application
By now, most of the “setting up” part is done and we are ready to move on to writing the code.
Let’s start by doing the simplest thing which is Adding the API KEY that we created in the previous section
All of this data is stored in a separate file called bootconfig.json inside the www/ folder. So open that up and paste the following code inside it
{
  "remoteAccessConsumerKey": "API KEY",
  "oauthRedirectURI": "https://login.salesforce.com/services/oauth2/success",
  "oauthScopes": [
    "web",
    "api"
  ],
  "isLocal": true,
  "startPage": "index.html",
  "errorPage": "error.html",
  "shouldAuthenticate": true,
  "attemptOfflineLoad": false
}
Now that we have the API Keys set up and we are connected to salesforce, let’s write the code inside the App Component for Fetching a list of the Contacts
import { Component } from '@angular/core';
import {OAuth, DataService} from 'forcejs';
@Component({
  selector: 'app-root',
  templateUrl: 'app.component.html',
  styleUrls: ['app.component.scss'],
})
export class AppComponent {
  data: any;
  constructor() {

let oauth = OAuth.createInstance();
oauth.login().then(res => DataService.createInstance(res));

    let service = DataService.getInstance();
    service.query('SELECT Id, Name from CONTACT')
        .then(res => {

this.data = res.records;

    });
      }
}
Let’s have a step-by-step walkthrough of the above code
- Firstly, we import the Salesforce Modules – Oauth & DataService as we need Oauth for Authentication and DataService to get access to the contacts
- Inside the AppComponent class, we create a variable called data and assign it the type any ( recall that we are using Typescript and it is important to declare types for all the Class Variables that you are using ) However, to keep things simple we’ll stick to having any as the type meaning that variable can be any type
- Inside the constructor, we create an OAuth Instance where we wait for the user to Login
- After the user has Logged In, we create a new DataService Instance on which we perform a basic SQL Style Query on the CONTACT table to get a list of the Contact Records inside our Salesforce Database
- We then simply store the retrieved records inside the data variable to be used by the HTML
Now that we have written the code for fetching the contacts, it’s only a matter of a few lines of HTML Code to display the data fetched
<ion-app>
  <ion-header [translucent]="true">
    <ion-toolbar>
      <ion-title> Contacts List </ion-title>
    </ion-toolbar>
  </ion-header>

  <ion-content [fullscreen]="true">


    <div id="container">
      <strong>Here's a list of your Salesforce Contacts </strong>
      <li *ngFor="let contact of data">
        {{ contact.Name }}
      </li>
    </div>
  </ion-content>
</ion-app>
The above code should be pretty standard if you’ve worked with Ionic Angular before, but still,l let’s have a quick run-through of what’s happening in the HTML code above
- Firstly, we divide the app into two sections, <ion-header> and <ion-content> and wrap them inside a Root Container called <ion-app> representing the Ionic App
- Inside the <ion-header> section, we simply display the App heading as Contacts List
- Similarly, inside the <ion-content> section, we start by giving a Descriptive Message: “Here’s a list of your Salesforce Contacts”
- Then, to display the contacts we use an Angular For Lo or *ngFor attribute to loop through the data array and display the name of each contact by accessing the Contact.Name Property
- Another thing to note is that since contact.Name is a javascript variable and not valid HTML Code, we have to wrap it inside curly brackets {{ }}
And that’s it! We have finally completed the Ionic + Salesforce App!
To Build the Application for iOS or Android so as to publish them on App Stores, you have to run the following simple command inside the project folder
ionic cordova build android/iosThe New Way of building Salesforce Hybrid Apps ( ForceHybrid )

Now that we have had a really comprehensive look at how the OLD method worked for building Ionic + Salesforce Apps the new one shouldn’t be much difficult to grasp at all.
But we still discussed the older method as the current ForceHybrid Method has one drawback that might put off quite a lot of people
- DOESN’T Support Ionic by default
Salesforce and Ionicv2 used to have a Collaborative Project together where it was really easy for developers to build apps for salesforce using ionic.
But sadly, Salesforce has now moved onto something called ForceHybrid that can only build WebView HTML5 Style Apps, ( something like Cordova/Phonegap ).
However, you can still make use of Angular or React in your project if you prefer
Installing ForceHybrid to build SalesForceHybrid Apps
Unlike the old method, installing ForceHybrid should be a pretty simple process and can be done by using the following command
npm install -g forcehybridCreating a ContactManager App using ForceHybrid
To create a new forcehybrid app, we run the following command
forcehybrid create
    --platform=android,ios
    --appname=SFContacts
    --packagename=com.curiousco.sfcontacts
    --organization=CuriousCo
Running the above command will show you the following interactive terminal where you can customize the app according to your needs. For this tutorial, we’ll be sticking to the defaults to keep things simple
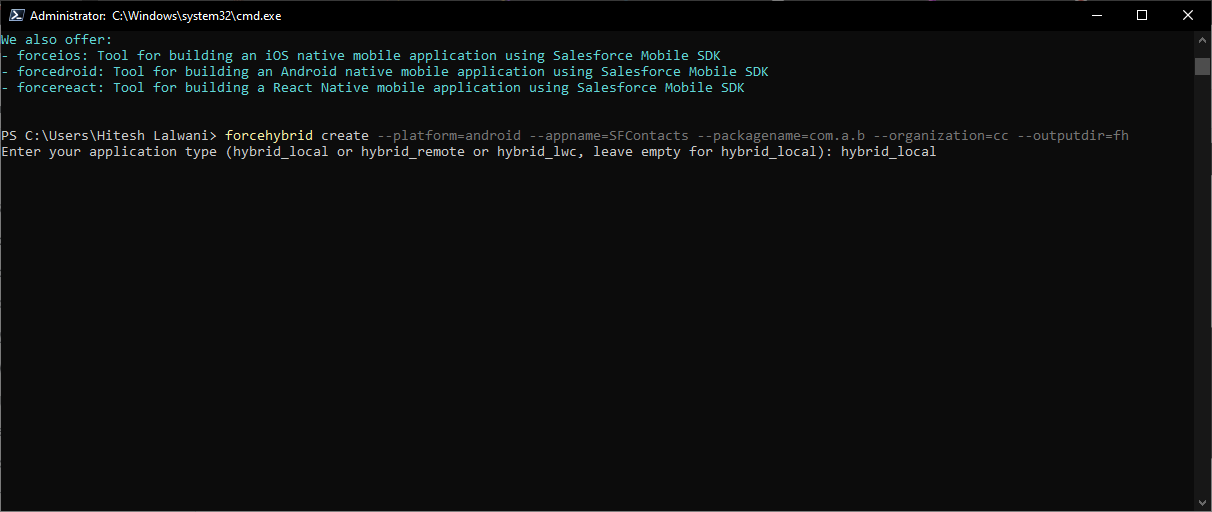
If the above command was successful, a new SFContacts folder will be created in your workspace which will have the following files
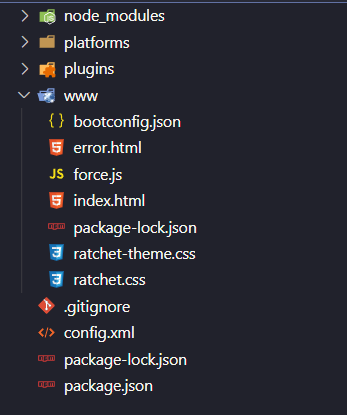
As you might have noticed, the above file structure is not much different from the Ionicv2 + Salesforce project structure, this is because it’s still a Cordova Project. The only difference is we cannot use Ionic Components here
Most of the Contact Fetching and Rendering Code should still be pretty much the same as the previous section, therefore there would be no point in re-discussing the same code over and over again
And the best part is that any New App created using ForceHybrid has the ContactManager template applied to it by default. So what you’re seeing above is technically a full-blown contact manager application without any of the hassles that we had gone through before.
If you’re still skeptical about this app already being a ContactManager app, open the index.html file and have a look at the code
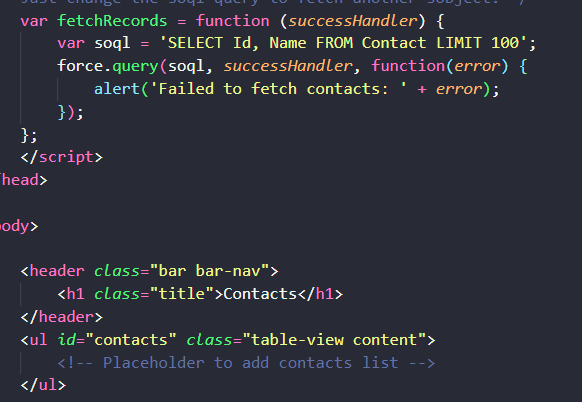
And as you can see, most of the code is pretty much the same like the Ionic + Salesforce Project the only noticeable difference would be that instead of using Ionic Components such as <ion-header> and <ion-content> we’ll be using standard HTML5 elements such as <header> and <section>’s
Another surprising thing is that the Build Process of both of these methods are also the same!
To build a ForceHybrid Application, we run the following command for Android & iOS
cordova build android/iosConclusion
Congrats on coming this far and learning about building Mobile Salesforce Applications using the Ionic framework. In this tutorial, we covered a wide range of topics dealing with all the frustrations & version numbers for the old method while also understanding the drawbacks of the new ForceHybrid method.
However, it’s always better to go with the ForceHybrid method despite its drawbacks because it’s never good to work on something obsolete and something that’s not supported. This can add unnecessary frustration to the development process and is not recommended. Hopefully, you learned something valuable about building Salesforce Apps today, and if you liked the article do share it with your friends!
