Building Cross-platform Applications Using PhoneGap/Cordova – TUTORIAL
Let’s say that one day, somehow you stumble upon the best Startup Idea, and you reach out to developers to make a website for your idea, being aware of the market, you also know that 90% of the time a user is spent on mobile applications, and only 10% browsing the internet so now you also spend time and resources into building an iOS and Android app.
All of that time could’ve been spent in a better way by actually working on the idea instead of worrying about the platforms, and that’s what we’ll be learning today, to build apps for web, iOS, and Android using the SAME TOOL! So you don’t need to worry about spending more time working on all 3 platforms. Sounds exciting? Let’s dive in!
Table of Contents
What is Cordova?
Apache Cordova / Phone Gap is an excellent framework for quickly building Cross-platform apps, for Web, Android, and iOS all using the same codebase. These types of frameworks usually fall under Hybrid App development. There are many such frameworks in the market, like React Native, Ionic, etc. But compared to all of those Cordova is extremely lightweight and fast as it does not depend on any other framework underneath. (React native depends on React, and so does Ionic depend on Angular.js, Vue.js, etc).
PhoneGap vs Cordova

Before moving ahead, let’s get this thing out of the way, you might have questions like What’s PhoneGap? Is it the same as Cordova? Or Are they both separate things and are required to build apps?
Well, they both are the same thing. Sounds weird, right? Why do they both have different names if they’re the same thing? That’s because of the history that this framework has. Initially, Cordova was built by Nitobi for easily building apps on Multiple platforms at once. Looking at its popularity Adobe purchased Cordova and rebranded it as PhoneGap. Then after a few years, they decided to make it Open-Source and again re-branded it as Apache Cordova which is what the current state of the project is. So from here on, I’ll be referring to it as simply Cordova.
How we’ll be learning Cordova/Phonegap
The best way to learn something, especially a new framework is to learn it by building a small sample application, or to “Learn by doing”. So Today, to learn the essentials of Cordova, we’ll be building a simple To-Do List Application and try to cover all of the awesome features that Cordova provides
What we’ll be building
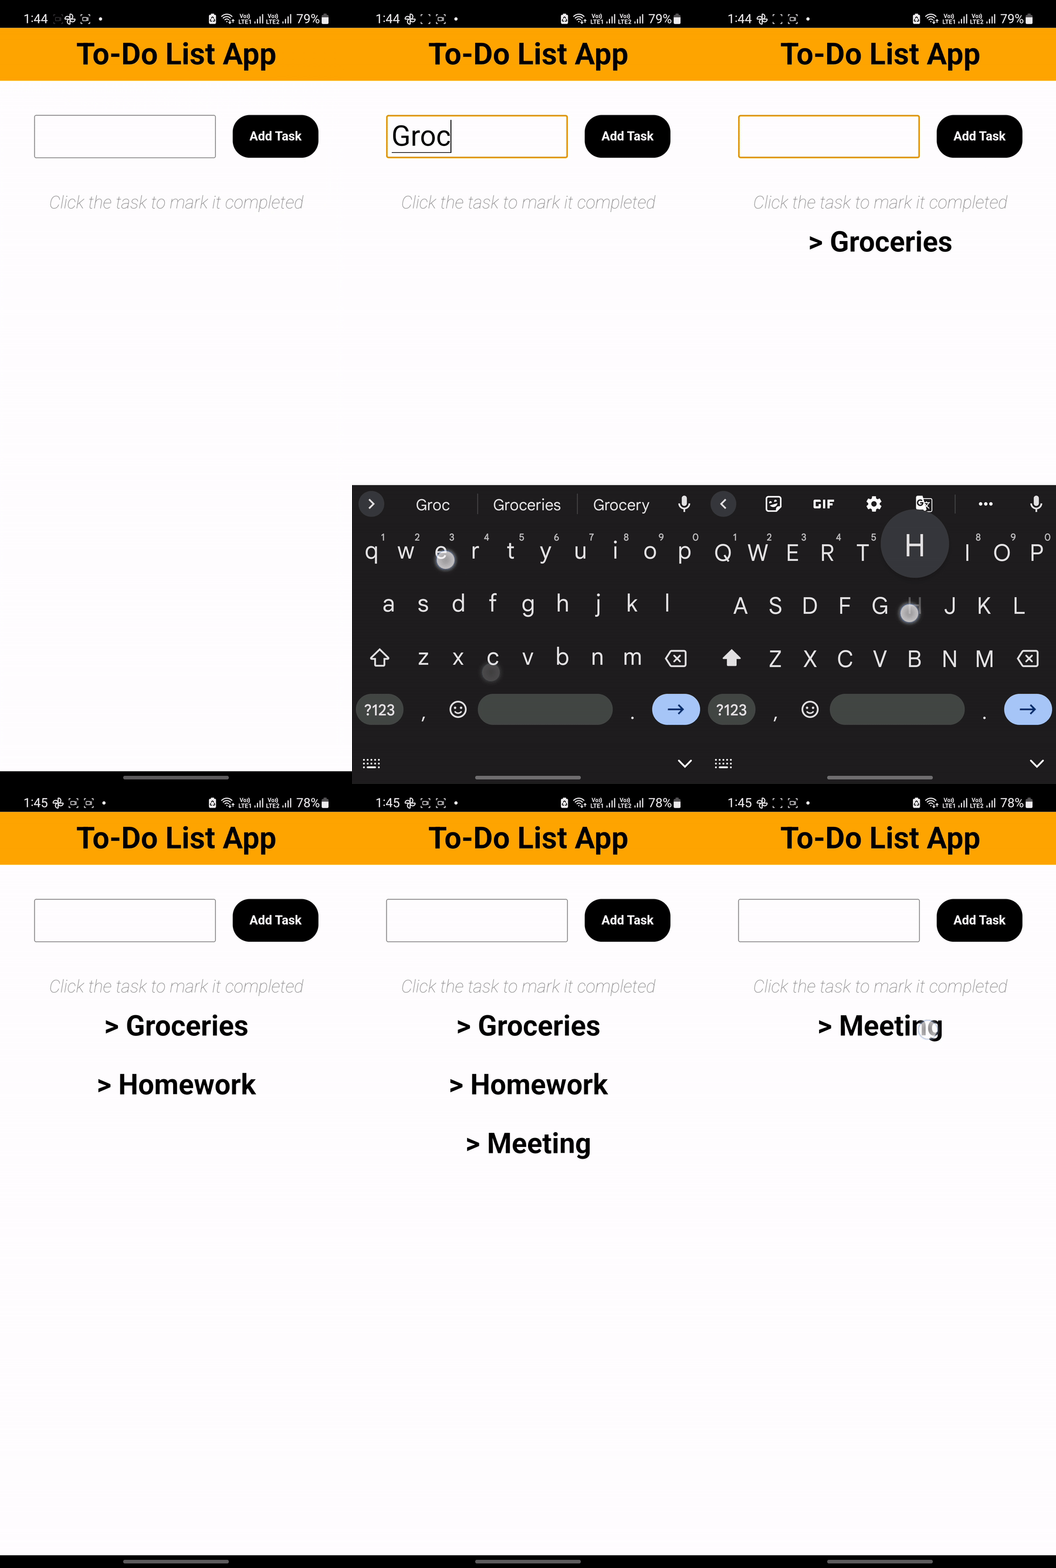
Here’s a look at the final application that we’ll be building
This will be a simple ToDo List app with only 2 functionalities
- Adding a task by tapping the Add Task button
- Deleting the task by tapping it again
Let’s now get started on our first Cordova Application!
Part 1: Getting the Necessary Tools for Cordova
To build a Cordova application, we first have to install some essential tools, since most of the people reading would be using Windows, I’ll mainly focus on that. However, don’t be afraid if you have a macOS/Linux since most of the procedures should be pretty similar
Node.js
If you went through Cordova’s website you might’ve noticed that there is no .exe file or anything that allows you to “install” Cordova, because it’s only available as a package on Node Package Manager, and to use that you have to install Node.js first.
To install Node.js, simply go to their website (https://nodejs.org) and download the latest stable version (Which, as of writing this article is 16.16.0 LTS) just follow the on-screen installation instructions, and voila! You just installed Node.js
Cordova
As we discussed, it’s only possible to install Cordova on something called NPM (Node Package Manager). Now that we have Node.js (and NPM) installed, we can install Cordova on our machine by simply running the following command on your CMD or Powershell.
npm install -g cordovaWhat this command essentially does is, installs the “Cordova” package globally (accessible from anywhere in the system), and that’s what the -g flag signifies
Tip if there’s some error running this command, (such as ACCESS DENIED) try running it by opening the CMD or Powershell as RUN AS ADMINISTRATOR, as it might require admin privileges to globally install Cordova.
Android Studio
Since we’ll be building android apps, we must have the Android SDK installed, to do that we first have to install Android studio from its official website. (Similar instructions, download the .exe file for windows, and follow the on-screen instructions to install).
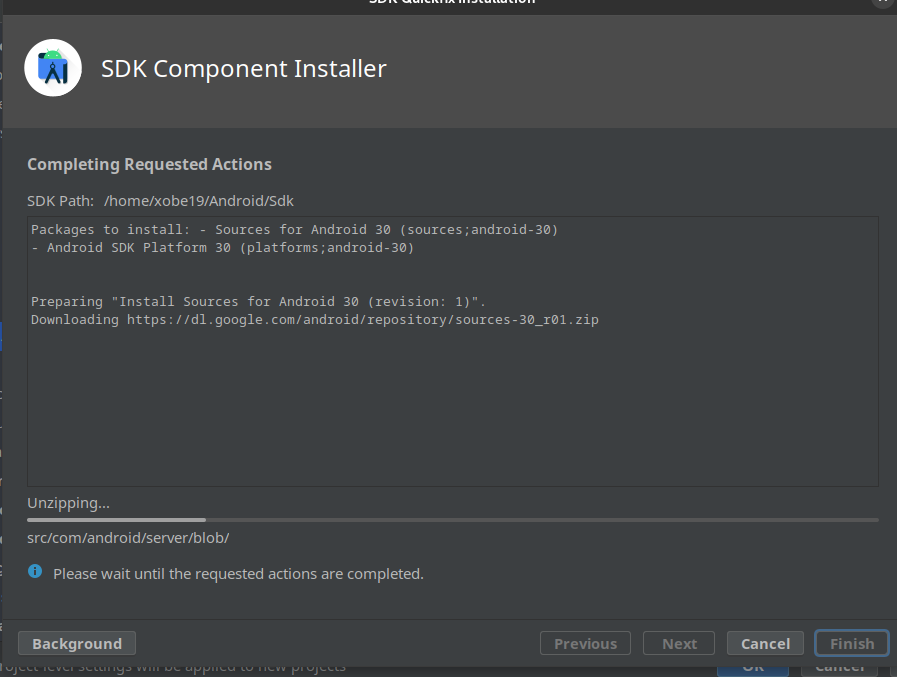
After installing Open Android studio and clicking on SDK Manager, then you’ll get a list of SDK Versions that you can install, The Latest Cordova version supports the Android 12 SDK, so select it and click on apply, the installation procedure should look something like this
After Installing the SDK, we have to install SDK Command-line Tools and Android SDK Tools, to do that, go to Home of Android Studio -> SDK Manager -> Tools and Select both of the options (Deselect Hide Obsolete Packages)
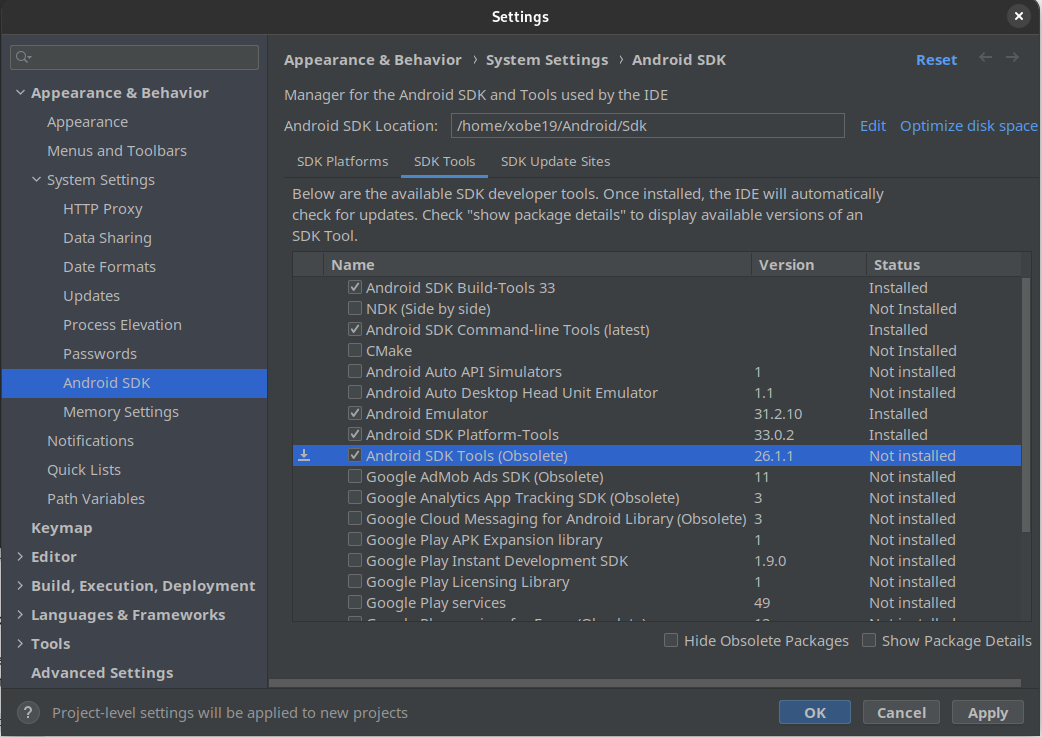
Click on apply, The installation procedure should look like the following
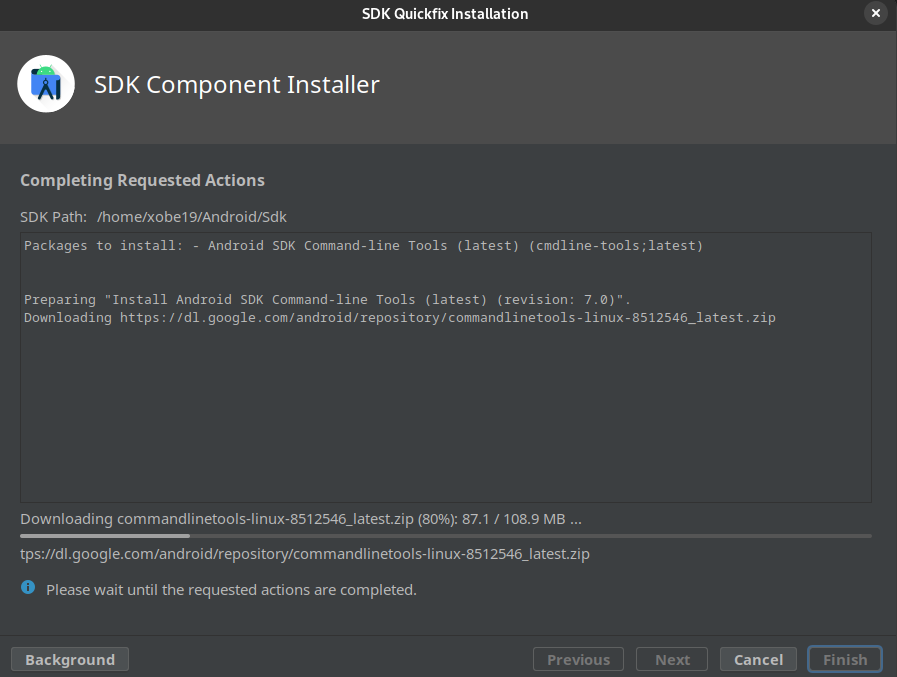
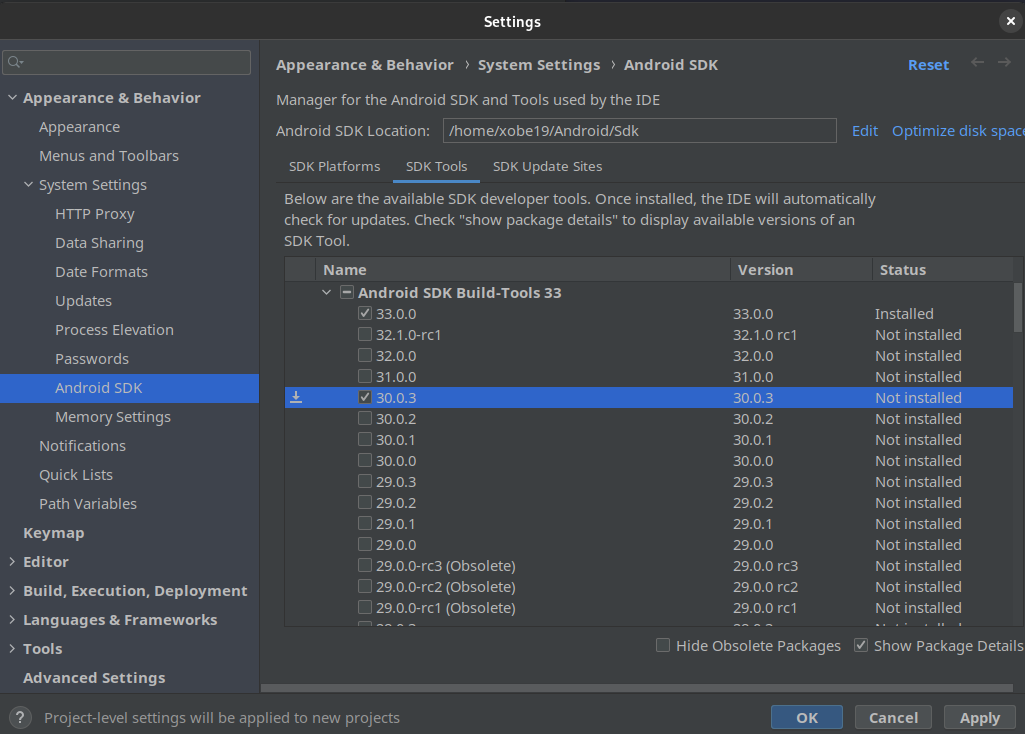
Now, we need to install the SDK Build-tools (The one which Cordova Supports is 30.0.3), To install that simply go to SDK tools, select Show Package details, and install the 30.0.3 Version.
Java Development Kit (JDK)

For Android development Cordova Requires you to have something called Java Development Kit or JDK, this is because JDK has some essential libraries and tools, that help Cordova in compiling our Android App
For Using Cordova 10.0.0+ (The latest version) We have to install JDK version 8. To do that simply visit Oracle’s official website for JDK, create an oracle account and simply download the installer from there. In a few minutes, you should have JDK Installed on your Computer.
Gradle
 Gradle is a build automation tool that Cordova requires for compiling/building our applications. To install Gradle, Simply visit their website and download the installer, and follow the instructions.
Visual Studio Code (Optional)
This part is completely optional as you can use any favorite IDE of yours. If you don’t know what an IDE is, it’s simply a program/software which makes writing code easier by providing advanced features such as Syntax Highlighting, detecting our errors before we even execute the program, etc. If you haven’t used an IDE before I’d recommend you install Visual Studio Code as that’s what most people prefer and that’s what we’ll be using in this tutorial as well.
If you have any problems during installation, you can read the in-detail installation guide on the official website of Cordova
Part 2: Setting up Our Cordova Project
Now that we have All of the essential tools For building a Cordova app, Let’s Start by creating a Cordova Project. To do that, we have to follow the steps below. Try to pay attention to what’s going on here, as you’ll repeat almost the same procedure every time you create a Cordova Application.
Steps
- Firstly open your terminal, and navigate to the Folder Where you want to create your Project
Basics Of Command Line Navigation
In a windows terminal, to navigate between folders, we only use 3 main commands
- cd <directory name>: Here, cd means “Change Directory” If you want to go “inside” a folder of the current directory you are in, simply type cd <space> and then the name of the folder
cd Desktop\- To Navigate to the Parent folder of the current directory Simple use the following command, where .. refers to the parent folder/directory
cd ..- Lastly, to list all of the files/folders in your current directory, we use the following command
dir- Now that you’re in the appropriate directory, to create a Cordova project we simply have to run the following command
cordova create <folder name> <package name> <project name>Here folder name and project name should be obvious, the folder where we’ll have the project, and the name of the project. Let’s have a look at what Package Name is. Package Name is specific for Android Applications, every android app has a package name to uniquely identify it in App Store and Play Store. The usual format for a package name is com.companyname.appname but it can be whatever you want.
For our case, to create the ToDo application we have to run the following command
cordova create todo com.curiousco.todo ToDoAppUnderstanding the Structure of a Cordova App
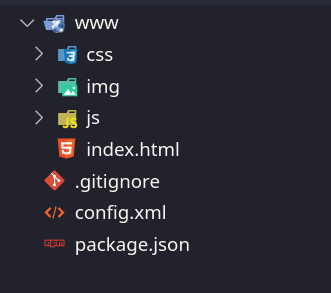
- Now you’ll see that a new folder called Todo is created. Let’s have a look inside that folder
- You’ll notice that there are 2 files and one folder, config.xml, packages.json, and a folder called www
- Config.xml has the basic configuration of our app, it has details such as our package name, project name, etc. We won’t be making any changes / using this for the most part.
- Packages.json is a part of the NPM using which we installed Cordova, its job is to manage all of the packages we installed, for the most part, we don’t need to interact with this file as it is managed solely by NPM.
- www folder, this is the part of the folder, in which we will code our app. Cordova works in the following way, we write our standard HTML, Javascript, and CSS code as we normally would for a website, inside this folder. Later we just put in a command that compiles the code inside the www folder into an Android Application
Adding Support for Android Platform
Before Starting to code, we must let Cordova know what platforms we need the app on, As of now, Cordova Supports iOS and Android Applications Completely. But to compile IOS applications we would need to install programs that are only available on macOS, As this article is mainly geared towards Windows Users, we’ll be focusing on Android Applications only, but don’t worry as there isn’t much of a difference between the compilation of an android app or an iOS app in Cordova, and if there’s anything you can always visit the official website to learn more.
For now though, to add support for Android in Cordova, we have to use run the following command
cordova platform add android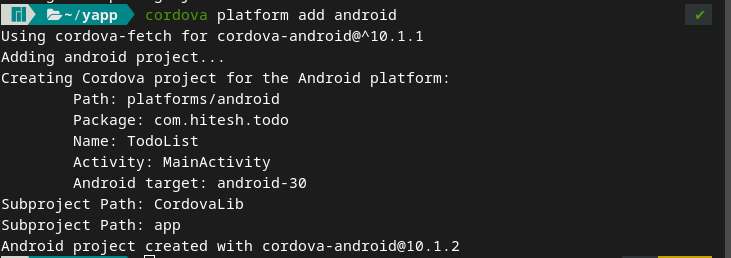
Compiling The Android App
With this we’ve completed our basic setup for the Cordova Application, to check if everything’s working properly, let’s try compiling our Android App by running the following inside our terminal.
Tip: To open a terminal inside Visual Studio Code, simply run the following shortcut – Ctrl + Shift + ~
cordova build android
Depending on the speed of your computer, you might have to wait for a while, if everything goes right, your application will be compiled and you will get a success message which looks something like this

Running the App on Emulator
Now that we have generated the application’s APK file you can very well transfer it to your phone and install it. But as you are working on the application, you will realize that this is a very tedious process. Hence, we have something called Emulators which will provide us a way to Emulate the android apps on our computer, without ever needing an android phone. If you’re on a modern computer, then I’d recommend using Emulators.
The best part about it is the Emulator already comes pre-installed in the Android-SDK! To run the Cordova app on the Emulator, simply run the following command
cordova emulate androidIf everything goes right, you should get the following in the terminal

And your android emulator should be launched with the application,
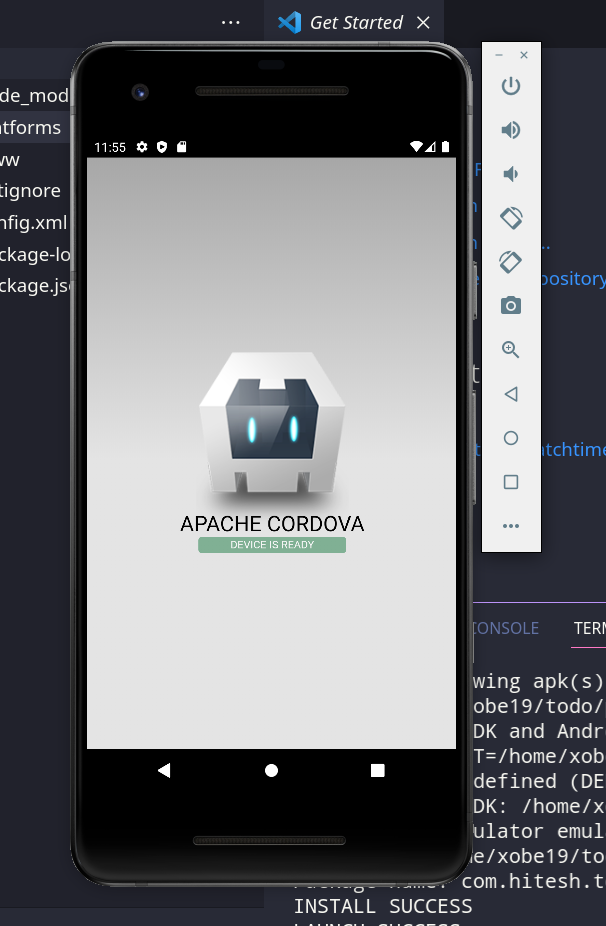
Tip: if you get an error saying Could not find target matching { type: ’emulator’ } then simply go to Android Studio, and Click on Create a Virtual Device, there you can set options such as What device you want to emulate (Pixel Phone, Nexus Tablet, Android TV, etc) Choose as per your preference and you’re good to go!
Part 3: Building The App using Cordova/Phonegap
If you’ve worked before with websites, you might already know that the main part of any website is its index.html file, which has the structure of the page, and then there’s a CSS file, which is responsible for the styling of the page, lastly, there is a javascript file which is responsible for the functionality of the page
If you look closely you will find that the files inside the www folder are also arranged in the same way,
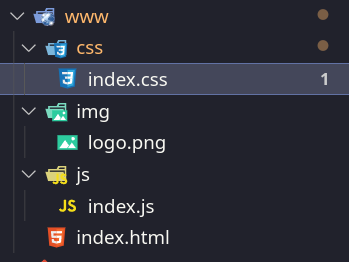
This is great, as we can simply start writing our code, without having to create or link files together, as Cordova has already done that for us.
We’ll be dividing our process into 2 parts, firstly, we’ll build the HTML, then the Javascript. Understanding CSS is out of the scope of this article, but we’ll still discuss the CSS being used for this particular app. If you would like to learn more about CSS, this is a great starting point.
Working on the HTML
If you open the index.html file, you might notice that it’s already filled with some code written by Cordova developers, let’s just remove all of that and try to build the HTML again, line by line
<!DOCTYPE html>
<html>
<head>
<meta charset="utf-8" />
<link rel="stylesheet" href="css/index.css" />
</head>
<body>
<div class="app">
</div>
<script src="cordova.js"></script>
<script src="js/index.js"></script>
</body>
</html>
This is what we’ll be using as a starting point for our HTML, if you are not familiar with HTML, let’s have a quick walkthrough of what’s happening here
In the first few lines, if you look inside the <head> tag you’ll notice that we’re linking the CSS file (recall that CSS is responsible for the styling of the website)
And Similarly, at the end of the <body> tag, you’ll notice we’ve attached 2 scripts, one is for the operation of Cordova and the other is our App.js which has the javascript code we’ll write
Looking at the final website, it’s easy to guess that now, we’ll need to put three things:
- The <input> tag
- The Add Task <button>
- The <div> container for showing the List of The Tasks
We can do so by writing the following code
<div class="app">
<h1>To-Do List App </h1>
<div id="input-container">
<input type="text" id="input" />
<button id="addTask">Add Task</button>
</div>


<h3 id="help"> Click the task to mark it completed </h3>


<div id="tasksList"></div>
</div>
Now if you run the app, you’ll see the input, the button, and the container, but they are not functional yet, to make them functional we have to use Javascript
Working on Javascript
As with the HTML file, you might also notice that there’s pre-written code here, let’s again remove all of that so that we can write code from scratch
In any Cordova app, we start with the following code
document.addEventListener('deviceready', onDeviceReady, false);


function onDeviceReady() {
console.log('app started!');
}
What we are essentially doing in the above code is, that we’re waiting for the Cordova framework to load before executing any of our javascript. We’re doing that by adding our code inside a function and then passing that function to the event listener which is fired after the framework is initiated.
If you don’t know about event listeners in Javascript, we pass them 2 things, the event, and the function to call when that event happens. So it’s listening for the event to happen. Try to get a good grasp of event listeners as we’ll be using them a lot in our javascript
Let’s first create a function that takes in the text of the task, and adds it to our tasks container
let tasksList = document.getElementById('tasksList');


const addTask = (text) => {
let task = document.createElement('p');
task.className = 'task';
task.innerText = "> " + text;
task.addEventListener('click', (ev) => {
ev.target.remove()
});


tasksList.appendChild(task);


}
Let’s have a step-by-step look at the code above
- To add a task to the task list container, we first need to get the container by its ID. That’s what we’re doing in the first step
- Then we create a Task element by using the createElement() function.
- Inside that element we add its class as a task, we’re adding this class so that we can style the element in its CSS
- Then we set the text of the element to the text of the task
- Before adding or appending it to the tasksList container, we will add a click event listener to it, what it will do is wait or listen for the user to click the task, and as soon as the task is clicked, it’s removed from the tasksList container
- After all of this, our task element is finally ready, and we can append or add it to the tasksList container, by using the appendChild method
Now that we have the function ready, let’s make sure that this function is run whenever the user clicks the button
let input = document.getElementById('input');
let btn = document.getElementById('addTask');
btn.addEventListener('click', function() {
addTask(input.value);
input.value = '';


});
Let’s try to understand, line-by-line, what’s happening in the code above
- We first get our <input> and <button> elements, by using their id, the ID of the element is what we set in the HTML, (it starts with #)
- Then we add a click event listener for the button so that as soon as the button is clicked, two things happen :
- addTask() function is called using the text which was written in the input
- The text inside the input field is reset to an empty value ‘’
Styling the website
To get to the final product shown above, the following CSS was applied, if you want to learn how to style websites, this would be a great resource
* {
margin: 0;
padding: 0;
}
h1 {
text-align: center;
padding: 10px;
background-color: orange;
}
#input-container {
padding: 30px;
display: flex;
justify-content: center;
}
#input {
font-size: 30px;
width: 200px;
margin: 10px;
padding: 4px;
}
#addTask {
height: 50px;
width: 100px;
margin: 10px;
background-color: black;
color: white;
font-weight: bold;
font-size: 20;
border: 1px solid black;
border-radius: 20px;
}
#app {
display: flex;
flex-direction: column;
align-items: center;
}
#tasksList {
display: flex;
flex-direction: column;
align-items: center;
}
.task {
font-weight: bolder;
font-size: 30px;
margin: 15px;
}


#help {
font-weight: lighter;
color: grey;
font-style: italic;
text-align: center;
}
Bonus: Cordova Plugins
In Addition to just using HTML, CSS, and Javascript, Cordova also allows us to interact with Core Device Features such as GPS, Camera, Vibration Sensor, etc. To learn about how plugins work in Cordova, we’ll use the Vibration plugin, to give the user Vibration Feedback, whenever a task is added/removed.
Installing the Vibration Plugin
To add any plugin in Cordova, we run the following command
cordova plugin add <name of the plugin>In our case, the name of the plugin is Cordova-plugin-vibration, so executing the below command should install the plugin.

You might’ve noticed that a new folder called plugins was created as soon as you installed your first plugin, This is where Cordova stores all of its plugins
Using the Vibration Plugin
Usage of the vibration plugin is very simple, whenever you want to vibrate, you simply call navigator.vibrate([time array]), here time array is the array of Intervals when vibration should happen
An example for Time array would be = [1000,500,1000]
The above time array would vibrate the phone for 1000 milliseconds, then silence for 500 milliseconds, and then again a vibration for 1000 milliseconds, Using this you can create almost any type of vibration sound you might want
Now let’s insert the following code for a 0.5-second long vibration whenever a task is removed
let tasksList = document.getElementById('tasksList');
const addTask = (text) => {
let task = document.createElement('p');
task.className = 'task';
task.innerText = "> " + text;
task.addEventListener('click', (ev) => {
ev.target.remove()


// adding the long vibration
navigator.vibrate([500]);
});


tasksList.appendChild(task);


}
Similarly let’s do a 100ms, 50ms, and 100ms pattern type vibration, so that we get a cool vibration, whenever the user adds a task. Here ms refers to milliseconds
let input = document.getElementById('input');
let btn = document.getElementById('addTask');
btn.addEventListener('click', function() {
addTask(input.value);
input.value = '';
// adding the vibration
navigator.vibrate([100,50,100]);
});
Conclusion
You’ve finally learned how to make apps for multiple platforms (mainly Android) by simply using basic HTML, CSS, and javascript. If you’re interested in this kind of hybrid app development, there are many more frameworks such as react native and flutter that you can try and explore, Or you can even continue by learning more about Cordova/Phonegap. As always if you’ve learned something new today, and found this valuable, do share it with your friends.

